Changelog
Follow up on the latest improvements and updates.
RSS
S: Estimated Delivery Date ETA's new AI Message Assistant turns a one-sentence campaign description into a finished ETA message in 5–10 seconds. Powered by Google Gemini 2.5 Flash Lite.
✨
How it works
Writing the message under “Add to Cart” has always had a long tail: pick the tone, remember which variables to drop in ({TimeCountDown}, {prep_min}, {country}…), keep it short enough not to break the layout, translate for every market. Every holiday means rewriting from scratch.
Now you describe your intent in one line — “Black Friday flash sale 48h, push urgency” — pick a tone and audience, and AI returns a ready-to-paste message with all the right variables already inserted.
Every result comes with an Audience Match card: the top 3 customer groups it fits, with confidence percentages, plus a short rationale so you know why AI chose that tone.

🎯
Tones, audiences, and 6 languages
Three knobs to shape the output:
- 5 tones— Urgency, Friendly, Premium, Professional, or a custom one you describe.
- 8 audiences— Impulse, Price-sensitive, Premium, B2B, Gift, First-time, Auto-suggest, or custom.
- 6 languages— English, Hindi, Chinese, German, French, Spanish — plus Auto, which follows your store’s language.
🔒
Safe by design
AI is constrained, not a freeform chatbot. It can only use a whitelist of 8 system variables — anything else is stripped before the message reaches you, so no broken placeholders on the storefront, ever. Output is capped at 60–180 visible characters, so messages never overflow the product card. Failed generations don’t count against your quota.
What it doesn’t do
It’s not a general chatbot — only the ETA message, only inside Estimated Delivery.
It doesn’t learn from your store data — every generation is an independent request, no history is kept.
It doesn’t replace manual editing — you can still hand-edit any message after AI generates it.
S: Estimated Delivery Date now pulls real delivery dates straight from your carrier — so the ETA your shoppers see on the product page is always live, never guessed.
Live carrier rates
Until today, the delivery days on your product page were a number you typed in. Every UPS service-level change, every peak-season delay, every new market — back into the app to update the table by hand.
Now, Estimated talks directly to your carrier. Connect your account once, and from then on every ETA on your product, cart, and checkout pages is pulled live, based on the real pickup postcode and the shopper's delivery postcode.
If the carrier slows down, your ETA slows down with it. Open a new market, no extra config needed.
Three carriers supported

We've added native integrations for the most common carrier accounts:
- Shippo— One connection, every major US and international courier (USPS, UPS, FedEx, DHL).
- Shiprocket— Built for India. COD support and a multi-courier marketplace baked in.
- ShipStation— For US merchants at scale. Multi-warehouse, multi-carrier, one ETA rule.
Run all three at once if you want. When more than one carrier is connected, just pick which one each rule uses from the Carrier dropdown in Auto settings.
What it doesn't do
- It's not order tracking — only ETA prediction at browse time, not post-ship status.
- It doesn't create shipping labels or book pickups.
- You still need your own Shippo, Shiprocket, or ShipStation account.
We’ve redesigned the navigation structure to make your setup and customization experience more intuitive - while keeping all existing features and logic fully intact.
🧭
1. Estimate rules
(New combined section)2 previous sections -
Estimate rules
and Appearance
- are now combined into 1 streamlined navigation: Estimate rules
.Inside, you’ll find:
•
Estimate rules
: Manage condition-based delivery date rules (as before).•
Appearance
: Customize how ETA information is displayed on your storefront.


✨ All existing data, logic, and features remain exactly the same - just easier to find and manage.
⚙️
2. Settings
(New combined section)We’ve also merged General settings and Translation into one unified navigation called Settings for a cleaner structure.

Inside
Settings
, options are now organized into 2 clear groups:General settings
•
Date and time
•
Geolocation and validity
•
Display and position

Advanced setting
•
Translation

💡 No functionality has been removed or altered - everything works just as before, only more organized.
❤️ We sincerely appreciate your continued trust and support.
Your feedback helps us continually enhance
Syntrack EDD
to deliver a smoother and smarter experience for you.Thank you for being part of our journey!
We’ve launched Shipping protection – a feature that safeguards customer orders from delays, damage, or loss. With one click at checkout, shoppers gain peace of mind while you reduce claims, streamline operations, and unlock a new revenue stream.

📍 Go to Navigation > Shipping protection > Choose your preferred display.
How It Works
1. Display at Cart and Checkout
- When customers are ready to pay, they will see the Shipping Protection option directly on the cart or checkout page.
- With just one click, they can add protection to their order.


2. Automatic product creation
- The app automatically generates a virtual product in Shopify called “Shipping Protection”.
- This product is added to the cart to ensure the protection fee is clearly displayed and transparently charged.
3. Flexible pricing methods
✅
Percentage pricing

- Merchants set a percentage (e.g., 2% of the cart value).
- The app calculates the fee based on the cart total.
- The fee is then rounded up to the nearest available SKU price from an auto-generated list (up to 100 SKUs, with incremental prices, e.g., $1.00, $2.01, $3.02…).
- Example: Cart value $60 × 2% = $1.20 → rounded up to $2.01 SKU.
✅
Fixed price

- Merchants set a single flat fee (e.g., $1.00), applied to all orders regardless of cart value.
4. Advanced settings
Merchants can fine-tune rules to maximize revenue and align with business strategy:
Percentage pricing

- Percentage: set the base rate
- Minimum charge: ensure a fee never falls below a certain amount.
- Increment amount: adjust SKU price steps (e.g., +$1.00, +$1.50, +$2.00).
Fixed price

- Min cart value: minimum cart threshold to apply protection.
- Max cart value: maximum cart threshold to apply protection.
- Protection price: the flat fee to charge.
This gives merchants full control over how Shipping Protection fees are calculated and applied.
You can now include the estimated delivery date (ETA) in the “Additional details” section of each order in Shopify.
📍 Go to ETA Checkout Extension > Checkout product line items > Customize to enable this setting.
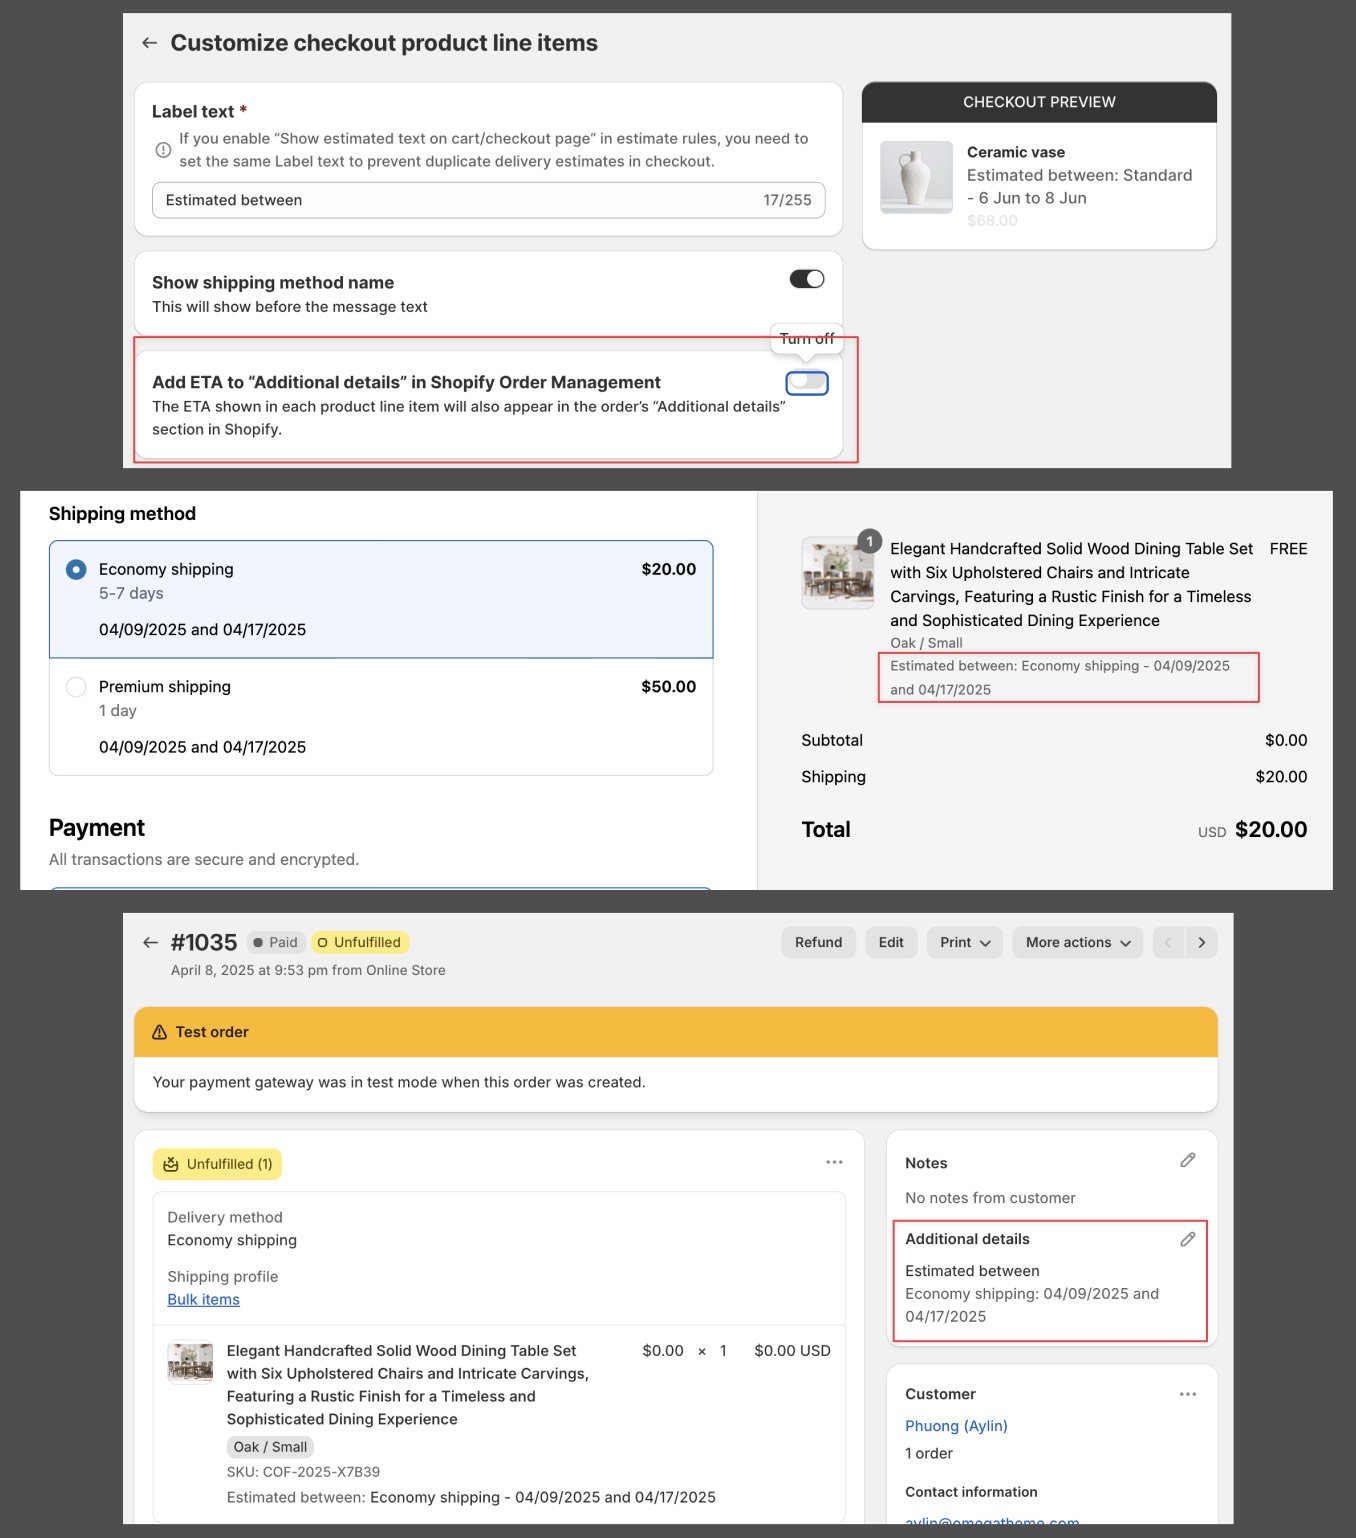
Once enabled, the ETA shown for each product at checkout will also appear in the order’s backend, making it easier to review delivery expectations after purchase.
You can now create delivery rules based on specific states, provinces, or counties within a country, giving you more control over regional delivery settings.

To use this condition, make sure to add the Country condition first, then add States/Provinces/Counties condition.

📌 Note: Location name differences may occur between the Estimated app and Shopify checkout due to local languages or administrative formats. If a location is missing or mismatched, please contact us for assistance with review or customization.
We’ve enhanced the Product Metafield and Variant Metafield item conditions in Estimate Rule Setup by adding support for two numeric metafield types:
- Decimal
- Integer
This update allows you to create more precise and flexible estimated delivery rules based on numeric metafield values, such as product weight, custom measurements, or production batch numbers.
How to set up:

- Add a new include or exclude Product/Variant Metafield condition.
- Select a metafield type: Decimal or Integer.
- Choose a metafield name (retrieved from your store’s metafields).
- Enter value in one of the following ways:
- Set a minimum (e.g. weight ≥ 2)
- Set a maximum (e.g. inventory ≤ 10)
- Set both min and max to define a range
- Leave both blank to apply the rule to products that do not have this metafield.
Note:
You can add multiple metafields under Product/Variant Metafield conditions. They have an OR relationship at the same level. 
We've introduced a new setting for the
'Inventory locations'
condition when using 'AND'
logic with 'Inventory Quantity'
: "Count inventory only from selected locations"- Turn OFF → Counts the total available quantity across all inventory locations.
- Turn ON → Counts only the available quantity from the selected locations.
Example:
Merchant setup:
- Location A: 0 units
- Location B: 100 units
- Total available quantity: 100
Rule setup:
- Include Inventory Location A
- AND Inventory quantity is min=max=10
Scenario 1: Option OFF (Counts all locations)
- Count total inventory = 100 (A + B)
- ✅ Condition matches → Rule is applied
Scenario 2: Option ON (Counts only selected locations)
- Count inventory in Location A = 0
- ❌ Condition does not match → Rule is not applied

In Rule Display Condition > Location Condition > Countries, Regions, we've added a new option: "Rest of the World."
Selecting "Rest of the World" includes all countries except those specified in other rules. If any country conditions exist in other rules, this option will automatically select all remaining countries.

The new template supports creating rules with most conditions and logic. Instructions are included in the file.
Unsupported conditions: Exceptions, States


Load More
→